Overhead Projector (OHP)
|
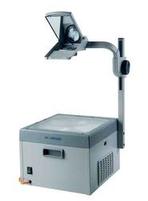
An overhead projector is a simple and reliable form of a projector. Overhead projectors are used to project images or written material onto a wall or screen. Overhead projectors were first created and used this is an image of a basic overhead projector made by the company M3; M3 is one of the biggest manufacturers of overhead projectors. by the US army in 1945 during World War II. Then, in the the late 1950s and early 1960s schools and business had access to overhead projectors.Though,
overhead projectors are old technology, they can still be found and used in most elementary/high school classrooms. It is in the 1990s, when overhead projectors were most popular. |
Parts of an OHP
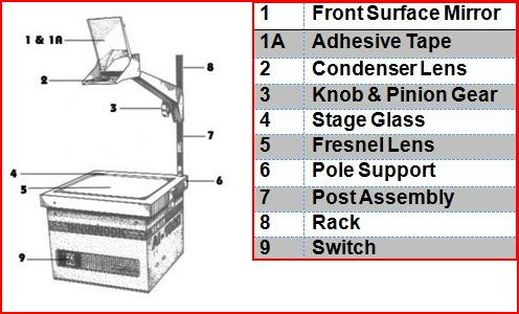
This image to the left is a detailed diagram of the major parts of an overhead projector. To the right, are all of the numbered parts that correspond with the diagram of the overhead projector (left).
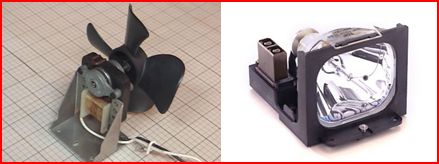
Lamp and Reflector - The lamp is the light source, and it is found on the base (box) of the overhead projector. The reflector is placed being the lamp, so that it can direct the light forward toward a mirror. The reflector is key because it prevents light from being spread inside the base. If there wasn't a reflector, the image being projected would be very dim. The condenser is used to focus or condense the light onto the mirror, it is positioned between the lamp and the mirror in the base.
Blower - It is important to have a cooling fan because the base unit produces a large amount of heat, and the overhead projector requires a fan to prevent it from blowing out. An electric motor powers the blower, and attached to the motor is the fan that releases cool air within the base of the unit.
Base Mirror - A mirror can be found in the base unit, which is at an approximate angle of 45 degrees. This mirror is there to change the angle of the light produced by the lamp and reflector from its original horizontal direction. Then light is reflected and directed upward by this mirror through the projector's stage.
Projection Stage -This is a glass surface where transparencies are placed to be projected. The projection stage is also where the Fresnel lens are placed to focus and magnify the image upward. The Fresnel lens have a unique/fuzzy appearance to it because the surface of the Fresnel lens is made of concentric rings.
Upper Section - Above the stage, there are more parts that consist of a focusing knob, an objective lens that admits light sent through the Fresnel lens and another mirror to guide the image ahead onto the wall/screen. the focus knob is used to focus image or written material by moving the upper section
up or down.
up or down.
Guidelines in Using OHP
- Practice giving your presentation using your visual aids to check out how well they project. This is a good time to also check for spelling errors. Have a friend sit and watch your presentation and make notes on any problems or needed improvements with your visual aids. Practice using your overhead transparencies so you will be comfortable with handling them correctly.
- Stand off to one side of the overhead projector while you face the audience - Too many people stand between the overhead projector and the screen causing a shadow of the presenter's body. Standing to one side will allow the audience to see you as the presenter and will prevent you from blocking their view of your visual aid.
- Do not face the "projected" image on the screen - Face your audience and not the screen. Many presenters face the screen and end up talking to the screen.
- Cover the transparency when you are done using it-with an opaque piece of cardboard (I usually mount a solid sheet of paper on one of my transparency frames). You may also turn off the projector completely, but beware, this can cause the projector bulb to burn out sooner.
- Bring a spare bulb!-Nothing is more unsettling than to have your overhead projector bulb burn out during your presentation. Bring spare bulbs and a glove to change the bulb. The old bulb will be HOT! Make sure you know how to change the bulb. CAUTION: Remember HOT glass looks the same as cold glass!
- Place the overhead to your RIGHT if you are right handed and to your LEFT if you are left handed-This will make it easier for you to face your audience and write if you need to. In either case, you want to stand in the center of the speaking area and face the audience when you speak.
- Place your overhead projector on a table low enough so it does not block you or the screen. Have a small table next to the overhead so you can stack your overheads before and after you use them.
- Place your screen on a diagonal instead of directly behind you-this will assure that you do not block the view for your audience. Also, have the top of the screen tilted forward towards the overhead projector (if possible) to prevent the "keystone" effect (This is where the top of the image is larger than the bottom).
- Tape the power chord to the floor-to protect you or someone else from tripping. As the presenter, tripping over the chord and falling, although humorous, is one large gesture you would prefer to avoid.
- Store your overhead transparencies in a sturdy box or container so they will stay clean and protected for the next time you need them. Label the box and include a "clean" copy of your handouts in the box. This will make it easier for you the next time you give your award winning presentation again.
SOURCE: (____). 2012. Overhead Projector.
Retrieved from:
http://mrclarkrbhs.wikispaces.com/Overhead+Projector Retrieved: July 15, 2015
